Part 1: Assessing the Need for a Roof Replacement
For a homeowner, deciding whether to replace a roof is a major financial and structural decision. This process begins with accurately identifying whether the existing roofing system has reached the end of its service life. This section aims to provide a diagnostic framework to help homeowners understand the root causes behind the visible signs of roof damage and the specific pressures that the unique climate of the Pacific Northwest exerts on a roof.
Chapter 1: Identifying the Clear Signs of a Deteriorating Roof
An aging roof signals its decline through various visible signs. These are not merely cosmetic issues but warnings of diminished protective function and potential structural integrity compromise. Homeowners should regularly inspect for and identify the following key signs.
Visual Evidence of Systemic Aging
The following are the most common indicators of an aging asphalt shingle roof, each revealing a different aspect of the roofing system’s health:
Missing Shingles: This is one of the most obvious signs of damage, often caused by high winds, especially on older or improperly installed roofs. Strong winds can tear or blow shingles away, leaving the underlayment and roof decking directly exposed to the elements, creating an immediate risk of leaks.
Cracked, Chipped, or Curling Shingles: These issues can be caused by physical impacts (like hail or falling branches) or prolonged moisture absorption. Over time, asphalt shingles can absorb water, causing them to distort, a phenomenon known as warping or cupping. This not only breaks the seal between shingles but also accelerates material deterioration.
Buckling Shingles: A wavy or rippled appearance on the roof’s surface is often a sign of deeper issues. It can be caused by the movement of the roof deck or wrinkling of the underlayment, indicating problems with the structural layers beneath the shingles that require professional assessment.
Warped Shingles: When the edges of shingles curl up or down, it is a clear signal of roof aging, heat buildup from poor attic ventilation, or improper installation. Warping compromises the waterproof seal between shingles, making the roof highly susceptible to leaks during wind and rain.
Granule Loss: The surface of asphalt shingles is coated with mineral granules that primarily protect them from UV radiation and improve fire resistance. As a roof ages, these granules erode. Finding a significant amount of granules in the gutters or seeing large black patches on the roof surface indicates that the shingles’ protective layer has failed, and their aging will accelerate dramatically.
Interior Signs: Water stains or discoloration on ceilings or walls are the most definitive proof that the roofing system has been breached and moisture is infiltrating the home’s structure. Action should be taken immediately upon discovering such signs.
Diagnosing from Surface Symptoms to Root Causes
Homeowners need to recognize that the visible signs of damage mentioned above are not isolated, easily fixable surface problems; they are often the external manifestation of a systemic aging process.
For example, a single warped shingle may not just be an issue with that shingle itself. It could be hiding a more severe problem of poor attic ventilation. Inadequate ventilation leads to the buildup of heat and moisture in the attic, which “bakes” the roof deck and shingles from below, causing premature aging and warping. Meanwhile, the accumulated moisture can also lead to mold in the attic, rot in the roof deck, and reduced energy efficiency for the home.
Therefore, simply replacing a warped shingle without addressing the root cause of poor ventilation is a temporary fix that treats the symptom, not the disease, and the problem will inevitably recur. This shift in thinking from “symptom” to “cause” helps homeowners move from reactive repairs to proactive diagnosis, thereby avoiding more expensive and complex repairs in the future.
Chapter 2: The Real-World Lifespan of Asphalt Shingles in the Pacific Northwest Climate
Understanding the true lifespan of asphalt shingles in Washington State’s unique and challenging climate is crucial for homeowners to engage in sound financial planning and manage expectations. The product lifespan years provided by manufacturers are often estimates under ideal conditions, whereas the reality in the Pacific Northwest is far more complex.
The Gap Between Manufacturer Claims and Regional Reality
Standard Life Expectancy: Nationally, standard asphalt shingles are rated to last between 15 and 25 years. However, this figure is significantly influenced by the local climate.
Regional Climate Challenges: The Seattle area’s persistent rain, high humidity, and overcast skies create an ideal environment for moss and algae growth, which are the primary “enemies” of asphalt shingle roofs. Moss can take root on shingles, trapping moisture, and its root system can physically lift and damage the shingles. Certain types of algae feed on the limestone filler in some shingles, accelerating their decomposition.
Lifespan Reduction: Due to these environmental factors, a “30-year shingle” that might last 30 years in other regions may only last about 17 years in the Seattle area. Similarly, a high-end “50-year shingle” may have a practical lifespan of 30 to 40 years locally. Recognizing this difference is key to long-term home maintenance budgeting.
The Compounding Effects of Pacific Northwest Weather
Moisture Saturation: Continuous rainfall accelerates the loss of surface granules from the shingles and weakens the core material, making it more susceptible to damage.
Damp Debris: Leaves and pine needles that fall on the roof become saturated after rain, trapping moisture on the shingle surface for extended periods, which accelerates material corrosion and aging.
UV Exposure: Despite its reputation for rain, the region also has sunny days. The alternating effects of UV radiation and a moist environment cause the shingles to repeatedly moisten, dry, expand, and contract, putting continuous stress on the material.
The Disconnect Between Warranty Promises and Actual Lifespan
A crucial concept is that a “lifetime” or “50-year” warranty from a manufacturer is not a guarantee that the roof will last that long in this region. These warranties primarily cover manufacturing defects, not the normal wear and tear accelerated by the local climate. For example, widespread granule loss after 10 to 15 years would typically be defined by the manufacturer as normal wear and tear, not a compensable manufacturing defect.
This disconnect between warranty policy and regional reality poses a potential risk to a homeowner’s financial planning. A homeowner might purchase “50-year shingles” and base their family budget for the next several decades on this, believing their roofing problems are solved. However, the reality may be that this roof needs replacement after 30 years, meaning a large, unplanned expense will arrive 20 years earlier than expected.
Therefore, when evaluating the true value of an asphalt shingle in the Pacific Northwest, one should focus more on its actual expected lifespan in the local area and the thickness and quality of the material, rather than relying solely on the marketing language in the warranty documents.
Part 2: Building Your Foundational Knowledge
This section is designed to empower homeowners by demystifying the technical aspects of a roofing system. Armed with this knowledge, homeowners will be able to communicate with contractors on a more equal footing, understand the details of a quote, and make more informed decisions.
Chapter 3: An Essential Roofing Glossary for Homeowners
A complete roof replacement project involves much more than just installing new shingles. It involves multiple components working together to form an integrated system that protects the home from the elements. Understanding the names and functions of these components is fundamental to evaluating a contractor’s quote and the quality of their work.
The Complete System from Decking to Shingles
Deck/Decking/Sheathing: This is the wooden foundation of the roof, typically made of plywood or oriented strand board (OSB), to which all other roofing components are attached. The structural integrity of the decking is paramount.
Underlayment: A layer of waterproof or water-resistant material installed on top of the roof deck and beneath the shingles. It serves as the roof’s second line of defense against moisture intrusion.
Ice & Water Shield: A special self-adhering waterproof membrane installed in the most vulnerable areas of the roof, such as the eaves, valleys (where two roof planes meet), and around all roof penetrations, to prevent leaks caused by ice dams or wind-driven rain.
Flashing: Components made of metal (usually aluminum, steel, or copper) used to seal the joints and penetrations of the roof, such as around chimneys, vent pipes, and skylights, to prevent water from seeping in. Flashing in the valleys is particularly critical.
Drip Edge: A metal strip installed along the edges of the roof (eaves and rakes) to direct water runoff into the gutters and prevent it from flowing behind the fascia board, thus protecting the wooden structure at the roof’s edge.
Shingles: The outermost, visible layer of roofing material that provides the primary protection against wind, rain, snow, and UV rays.
Ridge, Valley, Eave, Soffit, Fascia: These are key structural and architectural elements of a roof. The ridge is the highest point of the roof; a valley is the internal angle formed by the intersection of two sloping roof planes; the eave is the part of the roof that extends beyond the walls; the soffit is the underside of the eave, often with vents; and the fascia is the vertical trim board at the edge of the eave, to which gutters are typically attached.
A Roof is a System, Not Just Shingles
When considering a roof replacement, homeowners often focus on the color, style, and brand of the shingles. However, a high-quality roof is much more than that. It is a tightly integrated system of multiple parts working in concert. The failure of any one “minor” component can lead to the failure of the entire system.
For example, a contractor with a lower bid might choose to reuse old flashing or use a lower-grade underlayment to cut costs. While the homeowner may be pleased with the new shingles, a few years later, the aging flashing could fail due to corrosion or a broken seal, leading to a serious leak around the chimney. At this point, even if the expensive new shingles are intact, they cannot prevent water intrusion, and the homeowner will face costly interior repairs and partial roof rework.
Therefore, when evaluating a contractor’s quote, homeowners must look beyond the brand of the shingles and examine the quality of the entire system they plan to install. Does the quote clearly list the brand and specifications of all key components? Is the plan to replace all old flashing? Is high-quality underlayment and ice & water shield being used? The answers to these questions, more than the shingle brand itself, will determine the long-term performance and reliability of the new roof.
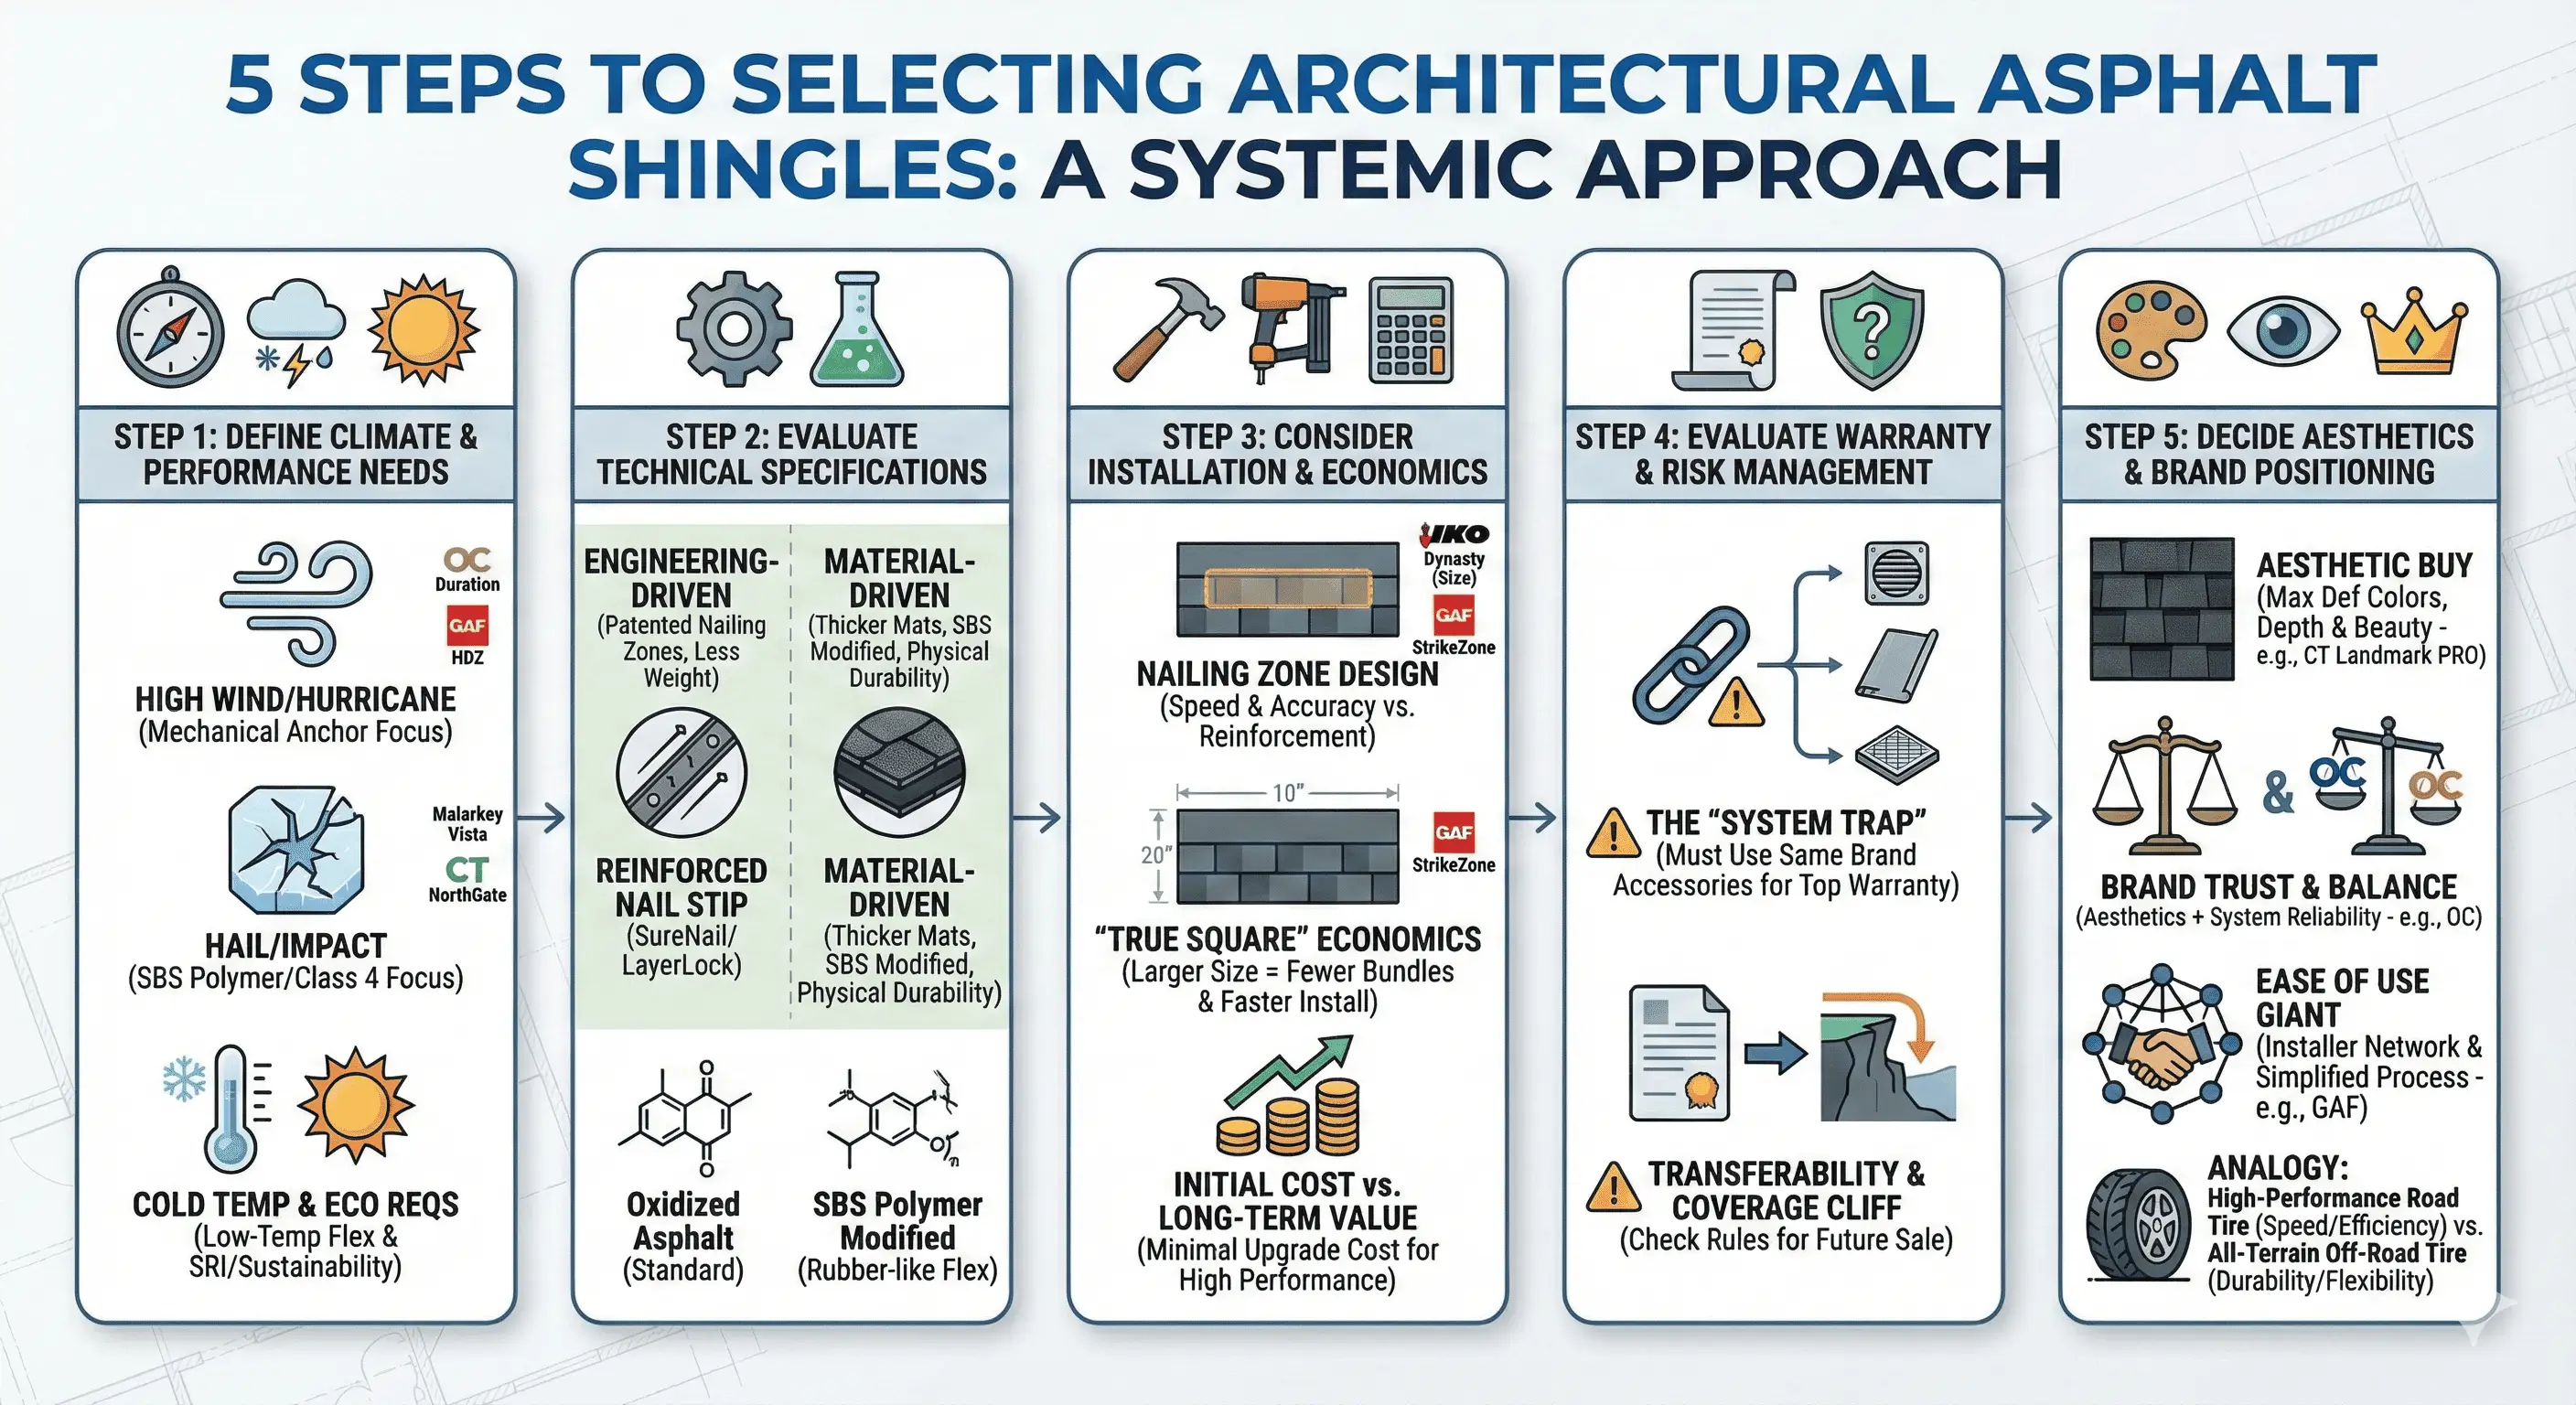
Chapter 4: Deconstructing Asphalt Shingles—Types, Performance, and Aesthetics
The asphalt shingle products on the market are not all the same. They differ significantly in structure, durability, appearance, and price. Understanding these differences will help homeowners make the best choice for their budget, aesthetic preferences, and durability expectations.
The Three Tiers of Asphalt Shingles
3-Tab Shingles: This is the most basic and economical type of asphalt shingle. It is made from a single layer of material and presents a flat, uniform appearance when installed.
- Pros: Low price
- Cons: Shortest lifespan (about 20 years), poor wind resistance, is being phased out of the market (making it difficult to find matching colors and batches for future repairs), and has a rather plain appearance with limited visual enhancement for the home
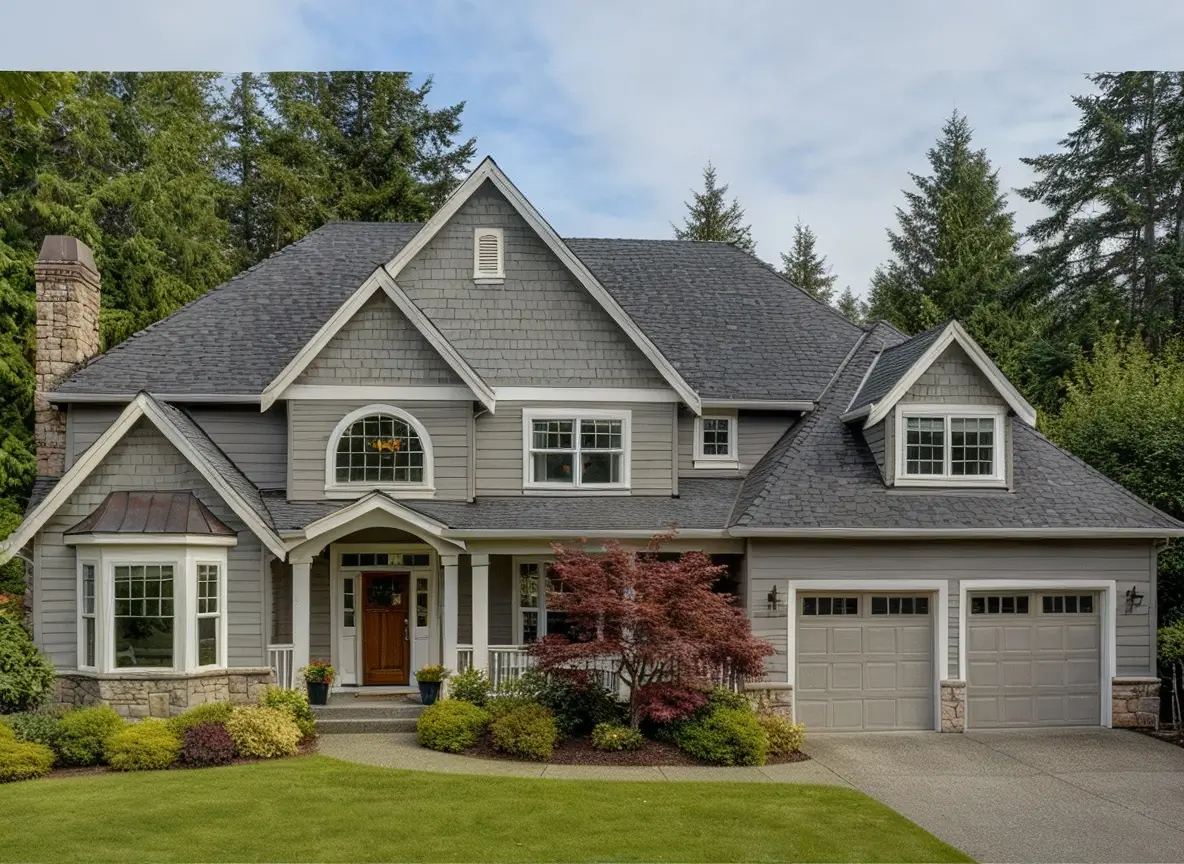
Architectural/Dimensional Shingles: This is currently the most mainstream choice in the residential market. It is made of multiple layers (or laminated) of material bonded together, making it thicker and more durable. The multi-layer structure gives it a three-dimensional texture when installed, capable of mimicking the look of natural materials like wood shakes.
- Pros: Excellent balance between cost and performance, significantly longer practical lifespan in the Pacific Northwest climate (typically over 25 years), stronger wind resistance, and a wide variety of colors and styles
- Cons: Higher price than 3-tab shingles, still has limited resistance to physical impacts like hail
Luxury/Designer/Premium Shingles: This is the highest-end asphalt shingle product. They are the thickest and heaviest of all asphalt shingles, designed to accurately replicate the look and texture of high-end materials like natural slate or premium wood shakes.
- Pros: Strongest durability and longest lifespan, can greatly enhance a home’s curb appeal, and offer the best storm resistance
- Cons: Very expensive, and the installation process is more complex and time-consuming
Understanding Impact Resistance Ratings (UL 2218 Classification)
In addition to the types mentioned above, asphalt shingles have another important performance metric: impact resistance rating. This rating is determined by the UL 2218 standard test, which measures a shingle’s ability to withstand impacts from objects like hail.
- Class 1 to 3: Offer progressively enhanced protection. For most homes, Class 3 impact-resistant shingles are a reliable choice.
- Class 4: This is the highest impact resistance rating. The test standard involves dropping a 2-inch diameter steel ball from a height of 20 feet twice, and the shingle must not crack. Class 4 shingles provide the best protection against hail and falling objects for a roof, and in some cases, homeowners who install Class 4 shingles may even receive a discount on their home insurance.
The “Good, Better, Best” Framework
The choice between 3-tab, architectural, and luxury shingles is not just a matter of budget, but a trade-off between upfront investment and long-term risk and value return. Architectural shingles have become the market’s mainstream standard precisely because they occupy the “sweet spot” in this trade-off for most homeowners.
While 3-tab shingles have the lowest upfront cost, their disadvantages—being phased out, difficulty in matching for repairs, and poor wind resistance—mean that their low price hides a high risk of premature aging and future trouble. Luxury shingles offer top-tier performance, but their price can be double that of architectural shingles, and for homeowners not planning to live in the same house for more than 30 years, their added durability may not provide a proportional return on investment.
In contrast, architectural shingles, with a modest price increase (typically 20-30% more than 3-tab), offer a huge leap in durability, lifespan, and aesthetics. They provide homeowners with the best balance of performance, cost, and risk against the Pacific Northwest climate.
Chapter 5: Analysis of Major Asphalt Shingle Brands and Their Warranties
After deciding on the type of shingle needed, homeowners will face the task of choosing a specific brand. This chapter will provide an objective comparative analysis of the major asphalt shingle manufacturers in the North American market, focusing on their flagship products, core technologies, and the crucial details of their warranty terms.
Market Leaders Overview
The North American asphalt shingle market is dominated by a few major brands, including GAF, CertainTeed, and Owens Corning. These brands are known for their product quality, innovation, and extensive distribution networks.
In-Depth Brand Analysis
GAF: As the largest roofing material manufacturer in North America, GAF is known for its popular Timberline series of shingles. The company offers a strong warranty system, such as its top-tier “Golden Pledge” warranty, but it typically requires installation by a GAF-certified “Master Elite” contractor to get the most comprehensive coverage.
CertainTeed: This brand is known for producing high-quality, heavy shingles, and its Landmark series and higher-end product lines have a strong reputation in the market. CertainTeed offers robust warranties, including the “SureStart Protection” full coverage period in the initial years of installation.
Owens Corning: As one of the industry giants, Owens Corning is known for its technological innovations, such as its patented SureNail Technology, which significantly improves wind resistance by creating a reinforced nailing zone on the shingle. The company offers different levels of warranties based on the product line and the certification level of the installing contractor.
Deciphering Warranty Terms
Understanding the fine print of a warranty document is crucial, as the literal meaning of “lifetime warranty” is often misleading.
Material Defects vs. Workmanship Issues: It is essential to distinguish between two types of warranties. A manufacturer’s warranty only covers manufacturing defects in the product itself (e.g., shingle delamination). A contractor’s workmanship warranty covers problems arising from improper installation (e.g., leaks). Most roofing problems stem from improper installation, making the contractor’s workmanship warranty particularly important.
Full Coverage Period vs. Prorated Depreciation: Many warranties offer full material and labor reimbursement for the first few years (e.g., the first 10 years). After this period, the reimbursement amount is prorated based on the age of the roof.
Key Exclusions: Warranties typically do not cover damage caused by improper installation, poor attic ventilation, extreme weather events (“acts of God”), or physical damage. Furthermore, “normal wear and tear” is a significant gray area, especially in a harsh climate like the Pacific Northwest.
| Feature | GAF | CertainTeed | Owens Corning |
|---|---|---|---|
| Flagship Architectural Shingle Series | Timberline HDZ® | Landmark® PRO | Duration® Series |
| Core Technology/Feature | LayerLock™ Technology, providing a wider nailing zone | NailTrak® wide nailing area design | SureNail® Technology, reinforced fabric nailing strip |
| Standard Wind Warranty | 130 mph (with special installation) | 110 mph (upgradable to 130 mph) | 130 mph |
| Algae Resistance Warranty | 25-year StainGuard Plus™ | 10-year StreakFighter® | 10-year Algae Resistance |
| Conditions for Enhanced Warranty | Must be installed by a GAF Certified Contractor | Must be installed by a CertainTeed Certified Contractor | Must be installed by an Owens Corning Preferred Contractor |
Table 1: Overview of Major Asphalt Shingle Brands
This table simplifies complex brand information into directly comparable key data points. Homeowners can see at a glance, for example, that to get the best warranty from a certain brand, they must choose a contractor with the corresponding certification.
Part 3: Evaluating Your Material Options
While asphalt shingles are the most popular roofing material in North America, they are not the only option. To ensure homeowners are confident that asphalt shingles are the right choice for their specific needs and priorities, this section will broaden the perspective by providing a contextualized comparative analysis of three common roofing materials in the Pacific Northwest.
Chapter 6: Comparative Analysis - Asphalt, Metal, and Cedar Shakes
This chapter will conduct a comprehensive and impartial head-to-head comparison of the three most common roofing materials in the region, using a consistent set of evaluation criteria to reveal the unique advantages and trade-offs of each material.
Evaluation Criteria
Each material will be evaluated based on the following criteria:
- Upfront Cost: Total cost including materials and installation
- Lifespan in the Pacific Northwest Climate: Realistic expected service life
- Durability and Weather Resistance: Performance against rain, wind, and physical impact
- Maintenance Requirements: The amount of work needed to prevent moss, rot, and corrosion
- Aesthetics and Appearance: Visual style and design versatility
Material Profiles
Asphalt Shingles: As the baseline for comparison.
- Pros: Lowest upfront cost, extremely wide range of styles and colors
- Cons: Shortest lifespan of the three materials, particularly susceptible to moss and algae growth
Metal Roofing:
- Pros: Extremely durable, very long lifespan (often over 50 years), excellent drainage, virtually maintenance-free, and energy-efficient (reflects solar heat)
- Cons: Very high upfront cost, can be noisy during rain without proper insulation and attic design
Cedar Shakes:
- Pros: Classic Pacific Northwest aesthetic, is a renewable resource
- Cons: High cost, requires significant maintenance (must be regularly treated to prevent moss, mold, and rot), and is a fire hazard (banned in some areas)
| Evaluation Criteria | Asphalt Shingles (Architectural) | Metal Roofing (Standing Seam) | Cedar Shakes |
|---|---|---|---|
| Average Upfront Cost | Low | High | Very High |
| Practical Lifespan in PNW | 20-30 years | 50+ years | 30-40 years (with high maintenance) |
| Maintenance Needs | Medium (requires regular moss cleaning) | Low | High (requires regular treatment and cleaning) |
| Moss/Algae Resistance | Poor | Excellent | Poor |
| Wind Resistance | Good | Excellent | Good |
Table 2: Pacific Northwest Roofing Material Comparative Analysis
This structured comparison table visualizes the complex trade-offs, making them clear at a glance. Homeowners can quickly make a judgment based on their personal priorities.
Part 4: Financial Planning and Cost Analysis
This section provides the specific financial data homeowners need to budget for a roof replacement project and understand quotes. All data is focused on the Seattle/King County market to ensure its relevance and accuracy.
Chapter 7: Estimating Asphalt Roof Replacement Costs in the Seattle Area
This chapter aims to help homeowners establish a realistic budget by providing clear, localized cost data.
Understanding “Per Square” Pricing
In the roofing industry, costs are typically calculated in “squares.” One “square” refers to 100 square feet (about 9.3 square meters) of roof area. This is the industry standard, and homeowners will frequently encounter this term when getting quotes.
Average Costs in King County
In the Seattle area, the average cost of a new asphalt shingle roofing system is between $650 and $900 per square.
Depending on the type of shingle (e.g., standard 3-tab vs. architectural), the cost per square foot can range from $5 to $9.
It is worth noting that due to higher labor costs, roof replacement costs in Seattle are slightly higher than the national average.
Project Cost Examples
To make these numbers more tangible, here are cost estimate examples based on typical roof sizes:
- 1,500 sq ft roof (15 squares): $9,750 - $13,500
- 2,000 sq ft roof (20 squares): $13,000 - $18,000
- 2,500 sq ft roof (25 squares): $16,250 - $22,500
| Shingle Type | Average Cost Per Square | Estimated Total Price for a 2,000 sq ft Roof |
|---|---|---|
| 3-Tab Shingles | $500 - $700 | $10,000 - $14,000 |
| Architectural Shingles | $650 - $900 | $13,000 - $18,000 |
| Luxury Shingles | $900 - $1,500+ | $18,000 - $30,000+ |
Table 3: Estimated Roof Replacement Costs in the Seattle Area
This table provides homeowners with a clear, at-a-glance reference for expected costs in the local market. When homeowners start receiving quotes from contractors, this data can serve as a crucial “sanity check” tool.
Chapter 8: Key Factors Influencing the Final Project Cost
This chapter will delve into the composition of a roofing quote, explaining why two houses of the same size might have vastly different roof replacement costs.
The Anatomy of a Roof Replacement Bill
Materials: This is the single largest factor affecting cost. The choice between 3-tab, architectural, and luxury shingles, as well as the quality of other components like underlayment and flashing, will heavily influence the final price.
Labor: A significant portion of the total cost, influenced by regional wage levels, the experience of the crew, and the complexity of the project.
Roof Size and Complexity: This is a major cost driver. Steep pitches, multiple valleys, dormers, and skylights significantly increase the time, labor, materials, and risk required for the job, thus driving up the cost substantially.
Tear-Off of Old Roof: The cost of removing and disposing of the old roofing materials. This cost increases if multiple layers of old shingles need to be removed.
Decking Repair/Replacement: This is a key variable. If the contractor discovers rot or damage to the roof deck after removing the old roof, the cost of replacing these boards will be added to the final bill. This is one of the most common sources of “hidden costs”.
Permits and Fees: Municipal construction permits and inspection fees required for the project.
Accessibility: If the roof is difficult to access (e.g., surrounded by dense landscaping or without convenient truck access), labor costs may increase due to the extra time and effort required.
The “Complexity Multiplier” and Hidden Costs
The final cost of a roof is not in a simple linear relationship with its area; it is affected by a “complexity multiplier.” Furthermore, the biggest financial risk in a roofing project is the unknown condition of the roof deck before tear-off.
A homeowner might use a simple formula to estimate the cost: (roof area / 100) × (average cost per square). However, if their roof has a steep 12/12 pitch, three dormers, and two skylights, the situation is completely different. These complex structural features can cause costs to significantly increase. This complexity requires more intricate material cutting (generating more waste), more custom flashing, more time-consuming handwork, and additional safety measures.
Additionally, a contractor’s quote may only include a contingency for replacing a few sheets of decking. If widespread rot is discovered after tear-off, the replacement cost could unexpectedly increase by thousands of dollars. Therefore, homeowners need to view their roof not just in terms of area, but also in terms of complexity, and to proactively discuss the process and billing for unexpected decking replacement with the contractor before signing a contract.
Part 5: The Process of Selecting a Professional
This is the most actionable part of the report, designed to provide a step-by-step guide to help homeowners find, vet, and hire a qualified and trustworthy contractor in Washington State.
Chapter 9: A Guide to Finding and Vetting Roofing Contractors
This chapter focuses on where to find reputable contractors and how to conduct an initial screening.
Channels for Finding Contractors
Manufacturer Certification Programs: Top brands like GAF certify contractors who meet their standards. For example, hiring a “GAF Master Elite” contractor not only ensures a certain level of training and expertise but also provides access to the brand’s best warranties.
Better Business Bureau (BBB): This is a resource for checking a company’s history and rating, but it should be used as one of several sources of information.
Local Referrals and Online Reviews: While subjective, they can provide insights into a company’s customer service and quality of workmanship.
Initial Screening Questions
During the first phone call or meeting with a contractor, a series of basic questions should be asked, covering key information such as:
- Company’s history and experience
- Insurance status and coverage
- Whether they use subcontractors
- References from recent projects
- Warranty offerings
Chapter 10: Due Diligence - Verifying Contractor Credentials in Washington State
This chapter is a practical, step-by-step tutorial on how to conduct a thorough background check on potential contractors using the state’s official resources.
The Washington State Department of Labor & Industries (L&I) “Verify a Contractor” Tool
This is the core resource for due diligence. This tool is the authoritative source for official information about a contractor.
Step-by-Step Verification Process
- Visit the L&I Website: The direct URL is https://secure.lni.wa.gov/verify/
- Search for the Contractor: You can search by company name, owner’s name, or license number
- Check for an Active License: Ensure their contractor registration status is “Active” and not suspended
- Verify Bond: Confirm they have a valid bond. The tool will show the bond amount and the underwriting company
- Verify Insurance: Confirm they have valid liability insurance
- Check for Violation History: The tool will list any past safety or construction violations
- Check for Lawsuits: Crucially, the tool will show if there have been any lawsuits filed against the contractor’s bond
| Vetting Item | Contractor A | Contractor B | Contractor C |
|---|---|---|---|
| Verified active license on L&I website? | ☐ Yes ☐ No | ☐ Yes ☐ No | ☐ Yes ☐ No |
| Verified active bond on L&I website? | ☐ Yes ☐ No | ☐ Yes ☐ No | ☐ Yes ☐ No |
| Verified active insurance on L&I website? | ☐ Yes ☐ No | ☐ Yes ☐ No | ☐ Yes ☐ No |
| Checked for violations/lawsuits on L&I website? | ☐ Yes ☐ No | ☐ Yes ☐ No | ☐ Yes ☐ No |
| Provided a copy of insurance certificate? | ☐ Yes ☐ No | ☐ Yes ☐ No | ☐ Yes ☐ No |
| Provided a list of local customer references? | ☐ Yes ☐ No | ☐ Yes ☐ No | ☐ Yes ☐ No |
| Offers a written workmanship warranty of at least 10 years? | ☐ Yes ☐ No | ☐ Yes ☐ No | ☐ Yes ☐ No |
| Quote clearly specifies policy for decking replacement? | ☐ Yes ☐ No | ☐ Yes ☐ No | ☐ Yes ☐ No |
Table 4: Contractor Vetting Checklist
This checklist breaks down the complex vetting process into a series of manageable, binary (yes/no) tasks.
Chapter 11: Deconstructing the Quote - A Framework for Comparing Roofing Estimates
This chapter aims to teach homeowners how to read a roofing estimate like an expert, identify red flags, and conduct a true “apples-to-apples” comparison.
Elements of a High-Quality Estimate
A professional, comprehensive estimate should include the following:
Detailed Scope of Work: An itemized description of each step, including:
- Tear-off of the old roof (and specifying the number of layers)
- Decking inspection/replacement protocol
- Underlayment installation
- Flashing details
- Shingle installation
- Ridge caps
- Ventilation system
- Site cleanup
Clear Material Specifications: Must list the exact brand and product name of all components (e.g., “GAF Timberline HDZ shingles,” “GAF StormGuard ice & water shield”), not just generic terms like “asphalt shingles”.
Decking Replacement Policy: A clear explanation of how damaged decking will be handled and the cost per sheet for replacement.
Workmanship Warranty: The contractor’s warranty on their labor, in writing, specifying the length and terms.
Property Protection Measures: Details on how they will protect your landscaping, siding, windows, and driveway.
Red Flags in an Estimate
- Vagueness: Lack of detail in the description of materials or scope of work
- Disclaimer Clauses: Clauses that absolve the contractor of liability for property damage
- No Mention of Decking: This is a major warning sign of potential hidden fees
- Excessively Low Price: A bid that is significantly lower than competitors often means the contractor is cutting corners
The Quote is a Reflection of the Contractor’s Professionalism
A roofing estimate is more than just a price list; it is a direct reflection of the contractor’s professionalism, thoroughness, and transparency. A detailed, comprehensive quote indicates a meticulous and professional operator. A vague, one-page quote with only a total price suggests a contractor who may be disorganized, cut corners, or be difficult to hold accountable if problems arise.
Part 6: Long-Term Care and Maintenance
This section provides homeowners with guidance on protecting their significant investment in the years to come, with a special focus on the unique maintenance challenges of the Pacific Northwest.
Chapter 12: Essential Maintenance Practices for Your New Asphalt Shingle Roof
This chapter will outline a simple, proactive maintenance plan to extend the life of your roof.
Regular Inspections
Conduct visual inspections from the ground twice a year (spring and fall). Look for:
- Missing or damaged shingles
- Granule accumulation in gutters
- Signs of moss or algae growth
- Any visible sagging or irregularities
Keep gutters clean and clear to ensure proper water drainage.
Handling Minor Repairs
For the handy homeowner, minor repairs such as replacing a single damaged shingle can be done as a DIY project. However, it’s important to understand when to call a professional:
- DIY appropriate: Single shingle replacement, minor flashing adjustments
- Call a professional: Multiple damaged areas, suspected structural issues, work near valleys or ridges
Chapter 13: Addressing Common Pacific Northwest Roofing Issues - Moss and Algae Removal
This chapter provides a safe, effective, and non-damaging guide to dealing with the inevitable moss and algae problems in the region.
Proceed with Caution for DIY Cleaning
It must be stressed that improper cleaning methods can cause serious damage to asphalt shingles. The most important point is: never use a pressure washer on an asphalt shingle roof. The high-pressure water stream can strip the protective mineral granules from the shingle surface, drastically shortening the roof’s lifespan.
Safety First
Before undertaking any roof cleaning, safety is the top priority. This includes:
- Using appropriate safety equipment (safety rope and harness)
- Wearing non-slip shoes
- Choosing a dry, overcast day for the work
- Having a helper present
Step-by-Step Moss Removal Process
-
Protect Landscaping: Before starting, cover plants and shrubs below the roof with plastic sheeting to protect them from the cleaning solution.
-
Gently Remove Large Moss Clumps: Use a soft-bristle brush to gently sweep away the thickest moss clumps, working from the top down in the direction of the shingles. Never brush up against the shingle edges, as this can damage them.
-
Apply Cleaning Solution: Use a pump sprayer to apply the cleaning solution. There are several options:
- Commercial Cleaners: Products like Wet & Forget or Bio-Advanced
- DIY Bleach Solution: Mix household bleach with water at a 1:3 or 1:4 ratio
- DIY Vinegar Solution: A milder alternative is to mix 1.5 to 3.5 cups of white vinegar with 2 gallons of water
-
Dwell Time: Let the solution sit on the roof for 15 to 20 minutes, but do not let it dry completely.
-
Rinse Thoroughly: Use a standard garden hose to rinse thoroughly from the top of the roof down. Do not use a high-pressure stream.
Prevention Strategies
To inhibit long-term moss and algae growth, install zinc or copper strips at the ridge of the roof. As rainwater flows over these metal strips, it releases metal ions that are toxic to moss and algae.
Conclusion and Final Recommendations
Replacing a roof is one of the most significant home maintenance investments a homeowner can make. In the Pacific Northwest, this decision is made more complex by its unique climatic challenges. This report aims to guide homeowners through the entire process, from problem identification to long-term maintenance, using a systematic framework that breaks down a daunting task into a series of manageable, information-based decisions.
Core Conclusions
Diagnosis Before Action: Visible roof damage is often a symptom of deeper issues. Understanding the root cause (such as poor ventilation) is crucial before deciding to repair or replace.
Realistic Expectations: In the Pacific Northwest, the actual lifespan of asphalt shingles is significantly reduced by persistent moisture and moss growth. Homeowners should base their budgets and replacement plans on regional realities, not just manufacturer warranty years.
Systemic Thinking: A roof’s performance depends on all its components working together, not just the shingles. When evaluating quotes, the quality of the entire roofing system (including underlayment, flashing, and ventilation) must be a focus.
Value Over Price: While upfront cost is an important factor, choosing higher-quality materials (like upgrading from 3-tab to architectural shingles) and a more professional contractor often yields a better long-term return on investment, reducing future repair costs and hassles.
Due Diligence is Non-Negotiable: Hiring a contractor is the riskiest part of the process. Using the Washington State L&I’s official tools to thoroughly verify a contractor’s license, bond, and insurance is a necessary step to protect your investment. A detailed, transparent quote is a strong indicator of professionalism and reliability.
Ultimately, a successful roof replacement project is not just about getting a roof that doesn’t leak; it’s about laying a solid foundation for the future health and value of your home through a wise decision-making process. With the knowledge and tools provided in this guide, homeowners can navigate this complex process with confidence, making the best choice that fits their current budget and safeguards their long-term interests.